
With quality camera capabilities, taking pictures on an iPhone has become easier than ever before. One relatively unnoticed yet highly influential camera tool is called Camera Grid. This tool is instrumental in improving composition, leveling, and overall visual balance without appearing in the final picture.
This complete guide should be able to answer questions like, “How do i get the Grid on my iPhone camera?”, “How does it work?”, and “Why does this feature matter?” It will also benefit beginner compositions and amputated users interested in shooting pictures that are much cleaner and sharper.
The answer will be in this article where you will find an explanation of the Camera Grid and including steps of how to turn it on for the most recent iOS versions, followed by appropriate usage of the tool, troubleshooting assistance, photography composition tips, and advanced composition techniques including an FAQ that covers most questions to ensure that you know how to use this feature to create better photos.
What Is the iPhone Camera Grid?
Prior to discussing how to enable the grid feature on your iPhone camera, it is first necessary to understand what this feature is and why it is used.
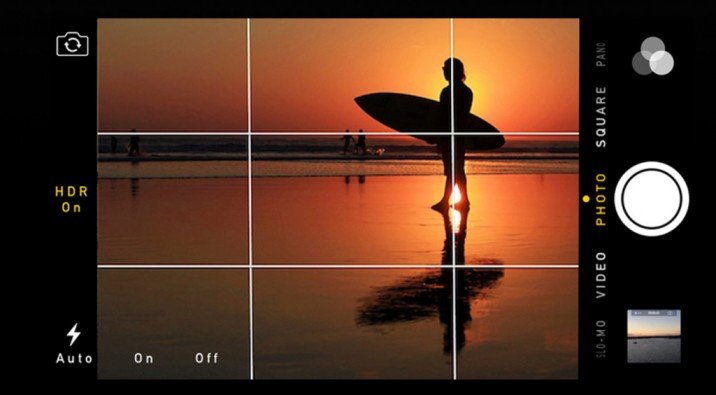
The iPhone camera grid is a functionality which binds the screen with two vertical and two horizontal lines, creating rows and columns to partition the screen into nine equal-sized rectangles. This screen layout is based on a composition principle which is widely used in photography and is known as the Rule of Thirds. This rule holds that photos stand to benefit in composition and visual interest by placing important subjects along the lines of grid or at their respective intersections.
While the use of external tools and an instinctive approach to composition is common among proficient people, the built in camera grid is useful and serves as a visual reference for many people and is useful for people of all proficiency levels.
Why the iPhone Camera Grid Matters?
One common question people have is whether or not the grid feature actually makes a difference. The answer is an emphatic yes. The grid feature provides people with a variety of practical benefits.
1. It Helps You Compose Shots Using the Rule of Thirds.
One of the most fundamental principles of photography composition is known as the rule of thirds. The focus of the principle is to draw the attention of the viewer to important subjects creation a composition which is balanced and visually pleasing. This is accomplished by placing subjects of focus at the intersections of the grid.
No matter if you’re photographing nature, people, or objects, the grid assists you in putting the subject in the most visually appealing location.
2. It Assists in Straightening Horizons and Lines
Possibly the most common photographs are those which have crooked or tilted horizons. The grid lines serve as a leveling guide, making it easier to capture the ocean, street lines, and buildings while keeping other horizontal or vertical elements straight.
3. It Enhances Symmetry
For those that love photographing buildings or making symmetrical images, the grid makes it easier to perfectly section off the subject.
4. It Removes Uncertainty
Without the grid, lots of people will unconsciously put the subject in the middle of the screen. This is somewhat fine, but can make the photo look unbalanced, or static. The grid offers you a clearer structure to work within.
5. It is Ideal for Video and Photos
The grid can be used in most camera modes and always will be there when it is active, such as for video, photo, panoramic, and portrait shots.
How to Get the Grid on the iPhone Camera in a Few Steps
Setting the grid up on an iPhone is quick and simple to do, and also has the same steps for recent iOS versions, like iOS 18, 17 and 16.
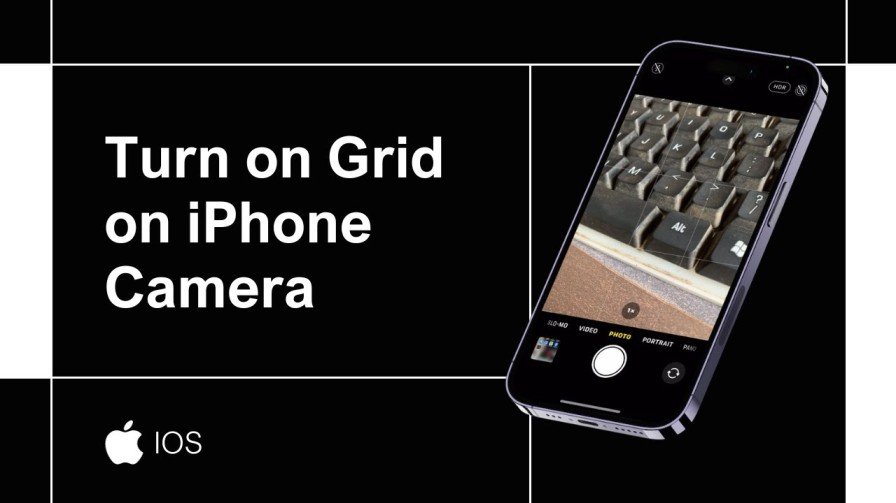
Step 1: Open Settings
Go to your iPhone’s Home screen and select Settings.
Step Two: Go To Camera Settings
In the Settings menu, scroll down until you see the Camera option and select it. Here you can see all the features and settings related to the camera.
Step Three: Enable the Grid
In the Camera Settings, find the option for Grid, which should be in the Composition section. Move the toggle to the right to the ON position.
Congratulations! You have successfully now enabled the camera grid for your iPhone! When you go to the Camera app, you will now see a set of all of the grid lines to assist you in framing and composing your shot.
How To Turn Off The Camera Grid?
If you ever need to disable the grid for any reason, just go back to the Settings menu, then Camera, then find Grid to toggle it to the Off position.
The grid will immediately be removed from the iPhone Camera app.
How To Use The iPhone Camera Grid?
Having the iPhone camera grid is just the first half of it. The value comes from understanding how to use it to your advantage to take better pictures and to achieve interesting compositions. Here are a few tips to help you maximize your photos using the grid.
1. Align the Horizon with a Horizontal Grid Line
Adopting this one practice will considerably improve the quality of your landscape photographs. Remember to position the horizon either towards the top third or bottom third of the frame, rather than the middle. If the horizon is in the middle, it slices the photograph in half, which could seem to create a less dynamic composition unless this is an intentional design choice.
2. Position Subjects at Intersection Points
The intersections of the grid are referred to as `power points`. Putting these in the frame with a person, object or main subject draws the eye’s attention, which is useful for creating a more balanced composition.
For example:
When shooting a portrait, if the subject is at an upper power point, the photo is more likely to be more engaging.
3. Keep Vertical Objects Straight
If the camera is off-center, vertical lines, such as the edges of buildings and trees, could appear to have an unwanted tilt. Keep parallel vertical lines with one of the vertical lines in the grid to make sure they are correctly aligned.
4. Use the Grid to Shoot Symmetry
Center the grid over the symmetry of your image. This is really helpful in architectural photography or shots that have leading lines, tunnels, and reflections.
5. Merging the Grid with the New Level Tool
Some iterations of iOS have a level. It’s a little line or indicator when your device is completely flat. Use this with the grid for any of the following:
- Overhead shots
- Tabletop product shots
- Flat-lay photography
It ensures your shot is parallel with your object.
6. Gridding for Portrait Mode
When capturing portrait shots, positioning the person along a single vertical line of the grid will often be more effective for storytelling than centering the subject.
7. Framing Macro and Close-Up Shots
The grid is also useful to more metropolitanically organize your details, even in close-up photography like flowers or products. More Advanced Techniques for Using the iPhone Camera Grid
When you have some familiarity with techniques
you can begin to explore more complex methods to push your photography to the next level.
1. Leading Lines Composition
Leading lines are lines, whether natural or artificial, that lead a viewer’s eye to a particular point in the composition. Examples are roads, railings, and rivers. Placing leading lines is often much easier with the grid.
2. Negative Space
Negative space is the empty space in the composition. It helps the subject to be more the focus of the composition.
Utilizing the grid enables one to:
- Position the subject off to the side
- Distribute the composition evenly
- Enhance the composition to ensure more clean, empty space
3. Capturing Subjects Behind Foreground Frames
To achieve the best compositional depth, position the subject at the intersection point, and use a foreground framing object such as:
- Branches of a tree
- Windows
- Curtains
- Architectural features
The grid aligns with the intentionality of your composition.
4. Adjusting Composition Quickly
The grid enables the user to capture fast-paced events by rapidly skimming the screen to ensure the user maintains an effective composition, rather than using manual framing.
Addressing Issues: The Grid Feature is Not Visible
In the case that all the steps have been followed and the user still does not see the grid in the camera, below are a few options.
1. Check That the Grid is Set To On
Ensure you are in Settings > Camera > Grid and check that the toggle is on.
2. Restart the Camera
Double tap the home button, or swipe up on the bottom of the screen, or close the app in multi-task view and then restart the camera app.
3. Restart the Device
If all else fails, a restart of the phone usually solves minor problems with the software.
4. Confirm iOS is Up to Date
Make your way to Settings > General > Software Update to confirm you are on the latest version.
5. Restore Camera Defaults
If the grid remains absent after the previous adjustment, consider resetting the camera app settings to default.
Settings > General > Transfer or Reset iPhone > Reset > Reset All Settings.
None of your data will be deleted, but default settings will be restored.
Suggestions for Capturing Professional-Grade Images and Videos Utilizing the Grid
The grid is an excellent starting point for great photos, but there are some other techniques that can be used for even better photos.
1. Focus and Exposure Lock
To lock the focus, tap your subject once; to lock exposure, tap your subject and hold until AE/AF Lock appears.Focus and exposure lock prevents the camera from refocusing and adjusting exposure level unexpectedly.
2. Optimize Convenience of Natural Light
Optimal natural lighting of a scene makes grid alignment even more effective by better highlighting, revealing, and showing contrast and shadows that more and less lead the attention to your subject.
3. Do Not Use Zoom
Move physically closer to your subject instead of zooming in. Not zooming in retains the image quality as well as allows for bounding of the frame and grid in a better way.
4. Try Different Grid Formations
Practice a scene that is shot and displayed in the center of the frame. Practice a scene that is shot and displayed aligned to the left or aligned to the right vertical frame. Practice once more where the scene is shot and displayed in an aligned vertical frame. Compare the outcome of each photoshoot and determine which ones are best for some specific scenes.
5. Burst Mode for Action Shots
The grid on the screen helps focus on the desired composition, but action can unfold and occur quickly. In these case, burst mode is recommended. Hold the shutter down for rapid exposures.
When to Not Use the Grid
While the grid is helpful, these scenarios may not be conducive to using the grid, and in these case, it may be best to turn it off.
Minimalist Photography
The grid can sometimes be counterproductive in minimalist set-ups. In these cases, it can be best to nota arch the grid and focus on the composition in a more freeform manner.
Very High Rate Shooting Situations
High velocity and erratic action may also be set-ups where the grid can be more distracting and troublesome with regards to timing a capture.
Centered Creative Photography
There may be some cases where centered framing of the composition may be stylistically deliberate, or where the framing is more relaxed.
Frequently Asked Questions on iPhone Camera Grid
1. Is the grid visible in the final photograph?
Not at all. The grid you see is only for guidance, and is lost in the final images and videos.
2. Does using the grid impact battery life?
Not. The grid has an almost invisible battery impact, as it only uses a negligible amount of system resources.
3. Is it possible to change the grid design?
No, it is not possible. The iPhone technician has set the grid at a 3 by 3 arrangement based on the rule of thirds.
4. Does the grid show up in all the shooting modes?
The grid is present in the majority of shooting modes, like photo, video, portrait, and square modes. However, in some modes, like panorama, the display of the lines may vary.
5. Why do some applications not show the grid?
The Grid is an integrated function of the iPhones Camera application. Other camera applications may opt to ignore grid overlays as they may have an inbuilt grid of their own.
6. Is the grid featured on older iPhones too?
Indeed, the grid function is found on most iPhone devices that have any up-to-date iOS.
7. Is the grid beneficial when shooting a video?
Certainly, it assists in correctly placing the horizon, aligned subjects, and in following movement paths, all of which leads to enhanced stability and improved composition.
8. Is it possible for the grid to assist in straightening pictures after they have been taken?
Not directly, of course. In the Photos app, the alignment may be corrected after the capture, but if the grid was used while the photo was taken, there will be a reduced need for that edit.
9. Why is the grid option toggle absent in settings?
If the toggle is absent, chances are that your device has an older iOS version, or you are operating within a limited profile. Owing to the iOS update, this issue is usually an easy fix.
Conclusion
While simple, enabling the camera grid on your iPhone is one particular adjustment that can significantly improve your photography skills. With very little effort, the grid provides invaluable assistance in following the rule of thirds, maintaining composition balance, straightening horizon lines, and photographing images that appear more professional. The grid is useful in all photography and improves your ability to capture and frame images in a more focused and purposeful manner.
The grid produces a more polished final image, especially when used in conjunction with other techniques, such as focus locking, lighting, awareness, symmetry alignment, and leading lines, that can make for a more visually interesting photograph. The subtlety of the iPhone camera grid is more apparent in its exclusion from the final image than in itself.
The grid camera on iPhones is useful for both beginners and more experienced photographers. If you have yet to use the camera grid for photography, trying it on a future shoot could significantly improve your ability to photograph all the wonders the world has to offer.